Thursday, December 10, 2015

Securing Rest Service with Spring Security


Time needed to complete  ~25 minutes

1.Introduction

Rest Services are common today and the change to be asked to develop one and secure it is 
high, this article will demonstrate how to do that. 


2.What is used in this tutorial:


1- Maven 3
2- Jdk 1.8
3- Tomcat 7.0.55
4- Eclipse Mars 4.5.1
5- Spring 4.1.8
6- Spring Security 4.0.2
7-MySql 5

3.Project Structure


4. Pojo and Rest Service

-  Person pojo class will be used as simple model with, Listing 4.1.


- Rest Service with 3 methods that will be secured in Listing 4.2. 


5. Spring Configuration


- Spring security configuration Listing 5.1. The path that will be /p/ , only authorized persons
with role ROLE_REST will be able to access the service, the users,roles and passwords are
stored in DB.
Note: don't forget to change username and password for database in security-context file  


6. Database tables


7. Deploying to tomcat

Note: don't forget to change username and password for tomcat server in pom.xml file

- Start tomcat.
- Deploy application from run configuration in goal type clean install tomcat7:redeploy
   click Apply and Run buttons.
7.1- In browser type http://localhost:8080/SecureRestExample/  will go to home page that is not secure , typing
http://localhost:8080/SecureRestExample/ p/test 
http://localhost:8080/SecureRestExample/ p/all 
http://localhost:8080/SecureRestExample/ p/1 will ask for username and password
entering 
 username: example@gmail.com  
password: 1b4f0e9851971998e732078544c96b36c3d01cedf7caa332359d6f1d83567014
will access rest service, Picture 7.1.


 7.2- OR can run CallRestServiceAppProgramatically class that uses RestTemplate from eclipse project ExampleRestClient.

Friday, October 10, 2014

websocket ActiveMQ


Time needed to complete  ~40 minutes

1.Introduction

This post will demonstrate how to use websockets with activeMQ. The client will receive 
data from message broker using stomp protocol via websockets.  

2.What is used in this tutorial:


1- Maven 3
2- Jdk 1.8
3- Tomcat 7.0.55
4- Eclipse Luna 4.4
5- Spring 3.1.1.
6- jQuery and plugins
7- Stomp protocol (stomp.js)
8-ActiveMQ 5.10.0 - Link to home Page
9- Web browser supporting websockets

3.Project Structure


4. Controller

- HomeController Listing 4.1, is for displaying web page.   


-   LiveRandomData class, listing 4.2, will connect and send messages to message broker, new message will be generated every 150 ms, it will send messages to defined destination simData , each message is a list of company objects that contains five companies with the stock price and change, the prices and change data is generated in method generateRandomdata(). 

note: don't forget to change phoenix-PC in MESSAGE_BROKER_URL to ip address or computer name where ActiveMQ is running.


5. View

-  Page stock.jsp contains a table Listing 5.1 where the data will be displayed.


6. Configuration


-In  /webapp/WEB-INF/spring/appServlet/servlet-context.xml Listing 6.1.

7. Connection & data display

- Javascript is used to connect to server and get the data Listing 7.1, it is assumed that ActiveMQ is running on the local machine if not change localhost to ip address where ActiveMQ is running, the default port for websocket in ActiveMQ is 61614 this value is defined in apache-activemq-5.10.0/conf/activemq.xml file, the connect() function will initialize stompClient, disable heartbeats(see note), connect to message broker, connect_callback will subscribe to simData topic and error_callback will handle error messages. When message is received callback will handle it. 

Note: As to the date of writing this post in ActiveMQ 5.10.0 there is a bug that disconnets the client with message: "Whoops! lost conection to ws://localhost:61614" for this reason heart beats are disabled and in  error_callback when connection is lost it will be automatically established again.


8. Deploying to tomcat

Note: don't forget to change username and password for tomcat server in pom.xml file

- Start tomcat.
-Start ActiveMQ (E:/Downloads/apache-activemq-5.10.0/bin/win64/activemq.bat for 64bit windows   OS)
- Deploy application from run configuration in goal type clean install tomcat7:redeploy
   click Apply and Run buttons.
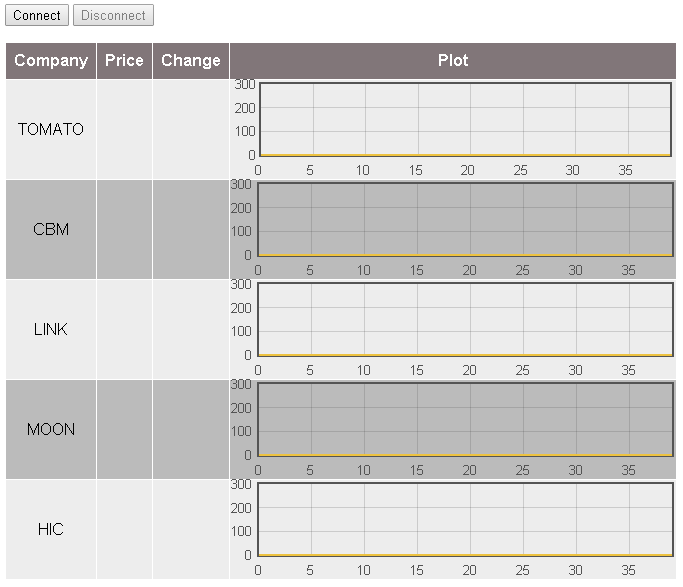
- In browser type http://localhost:8080/mb/ to see the form picture 7.1. Clicking Connect button, in   eclipse run main method in LiveRandomData.


- Video 8.1, shows the display of data.

9. Eclipse Project

Friday, October 3, 2014

Spring websocket


Time needed to complete  ~40 minutes

1.Introduction

This post will demonstrate how to use websockets with spring. The client will receive 
data from server using stomp protocol via websockets.  

2.What is used in this tutorial:


1- Maven 3
2- Jdk 1.7
3- Tomcat 7.0.55
4- Eclipse Luna 4.4
5- Spring 4.0.6
6- jQuery and plugins
7- Stomp protocol
8- Web browser supporting websockets

3.Project Structure


4. Controllers

- Two controllers are used, PageController Listing 4.1, is for displaying web page.  LiveRandomData Listing 4.2 is for generating random prices every defined period of time.   


-   Method retriveData() is anotated with @Scheduled it will run every 800 ms as it has fixeDdelay = 800 , it will send messages to defined destination /topic/simData , each message is a list of company objects that contains five companies with the stock price and change, the prices and change data is generated in method generateRandomdata(). 


5. View

-  Page stock.jsp contains a table Listing 5.1 where the data will be displayed.


6. Configuration


-In  /webapp/WEB-INF/spring/appServlet/servlet-context.xml Listing 6.1, in the websocket:message-broker definition the application destination prefix /app is used when sending messages to the server, /stock is the endpoint and it is used by the client to connect to url path using sockjs option.

7. Connection & data display

- Javascript is used to connect to server and get the data Listing 7.1, the connect() function will use SockJs to connect to endpoint /sws/stock where /sws is the path specified in pom.xml. after that stompClient is initialized and used to connect and subscribe to /topic/simData, when ever message is received dispay() function will handle it and display data . For using sockjs files sockjs-0.3.4.js and stomp.js are included in stock.jsp 


8. Deploying to tomcat

Note: don't forget to change username and password for tomcat server in pom.xml file

- Start tomcat.
- Deploy application from run configuration in goal type clean install tomcat7:redeploy
   click Apply and Run buttons.
- In browser type http://localhost:8080/sws/live/show to see the form picture 7.1. Clicking Connect button to start receiving data, Disconnect button to stop.


- Video 8.1, shows the display of data.

9. Eclipse Project

Sunday, September 28, 2014

Form Wizard


Time needed to complete  ~25 minutes
Prerequisite  File Upload & Saving

1.Introduction

After uploading files and write them to the file system in the previous 2 articles, now it's time to add some style to the form to look like wizard.

2.What is used in this tutorial:


1- Maven 3
2- Jdk 1.7
3- Tomcat 7.0.55
4- Eclipse Luna 4.4
5- Spring Core 3.2.9
6- jquery 1.11.1
7- FormToWizard plugin

3.Project Structure


4. Plugin and css

- FormToWizard -Home page link- is plugin that will transform form to wizard the javascript file 
for plugin is in project path /fileUpload3/src/main/webapp/js/formToWizard.js it uses style/form2wizard.css 

- Add formTowizard.js and form2wizard.css to carAdForm.jsp Listing 4.1. 

7. Deploying to tomcat

Note: don't forget to change username and password for tomcat server in pom.xml file

- Start tomcat.
- Deploy application from run configuration in goal type clean install tomcat7:redeploy
   click Apply and Run buttons.
- In browser type http://localhost:8080/fu3/carAd/show to see  step 1 of the form wizard,  picture 7.1.


- There is a validation, clicking Next button without filling data in step 1 will show error message,
fill data and click next to display the 2nd step, picture 7.2 


-Choose file(s) and submit form. This will display success page, Picture 7.3.


8. Eclipse Project

Saturday, September 27, 2014

Spring File Upload 2


Time needed to complete  ~20 minutes

1.Introduction

This article will show how to submit form that has file(s) to upload and write them to file system using spring framework.

2.What is used in this tutorial:


1- Maven 3
2- Jdk 1.7
3- Tomcat 7.0.55
4- Eclipse Luna 4.4
5- Spring Core 3.2.9

3.Project Structure


4. Form and controller

- CarUploadForm bean contains four fields, listing 4.1. 

CarAdController, Listing 4.2, the displayForm method will show the form in the get request and when the form is submitted saveForm method will handle the form data, save files to path in the file system. DIRECTORY_PATH is where the files will be written, this example used windows network path  \\PC-phoenix\car_images , change is to suite your path (car_images is a shared directory) the controller then return success page.


5. View

- Form is in page carAdForm.jsp, Listing 5.1.


6. Configuration

- In resources/spring/application-config.xml is the multipartResolver bean where the maximum size of each uploaded file can specified, Listing 6.1. Each uploaded file is limited to 1MB (1024000) using property maxUploadedSize.


- configure tomcat to be able to access  \\PC-phoenix\car_images  by adding file cars.xml to
path to tomcat diretory/conf/Catalina/localhost, cars.xml has one line, Listing 6.2.


7. Deploying to tomcat

Note: don't forget to change username and password for tomcat server in pom.xml file

- Start tomcat.
- Deploy application from run configuration in goal type clean install tomcat7:redeploy
   click Apply and Run buttons.
- In browser type http://localhost:8080/fu1/carAd/show to see the form picture 7.1.


- Enter some data in text field, select some files and Submit. Picture 7.2. There is a server side validation for Manufacturer,model and note fields, if any of them is not entered error message will be shown.


- After submitting the data entered in the carAdForm will be displayed in success page, picture 7.3.


8. Eclipse Project

Spring File Upload 1


Time needed to complete  ~20 minutes

1.Introduction

This article will show how to submit form that has file(s) to upload using spring framework.

2.What is used in this tutorial:


1- Maven 3
2- Jdk 1.7
3- Tomcat 7.0.55
4- Eclipse Luna 4.4
5- Spring Core 3.2.9

3.Project Structure


4. Form and controller

- CarUploadForm bean contains four fields, listing 4.1. 

CarAdController, Listing 4.2, the displayForm method will show the form in the get request and when the form is submitted saveForm method will handle the form data then return success.jsp page.


5. View

- Form is in page carAdForm.jsp, Listing 5.1.


6. Configuration

- In resources/spring/application-config.xml is the multipartResolver bean where the maximum size of each uploaded file can specified, Listing 6.1. Each uploaded file is limited to 1MB (1024000) using property maxUploadedSize.


7. Deploying to tomcat

Note: don't forget to change username and password for tomcat server in pom.xml file

- Start tomcat.
- Deploy application from run configuration in goal type clean install tomcat7:redeploy
   click Apply and Run buttons.
- In browser type http://localhost:8080/fu1/carAd/show to see the form picture 7.1.


- Enter some data in text field, select some files and Submit. Picture 7.2. There is a server side validation for Manufacturer,model and note fields, if any of them is not entered error message will be shown.


- After submitting the data entered in the carAdForm will be displayed in success page, picture 7.3.


8. Eclipse Project